End of last week some very special lils were going to be coming to spend the afternoon. Along with the warm weather, trying to do keep cool and wet while having fun tends to be more of a chore than anything
Hereditary diseases regarding health make filling up a kiddy pool out of the question. In fact anything that has non circulating water and that is not chemically balanced [green type chemicals are okay.] Can be extra dangerous for us. That said, my soon to be 3 year old does not follow… well much of any instruction or rules it seems lately. (Yes this mommy is maxed out from stress of constant power struggle with ‘pecking order’.) Now why I know it is just a phase, it still is button pushing never the less.
Back on track, so after having seen some very neat and fun looking variations of Water Walls* others made. I decided that it was something I had to make for multiple reasons. The simplest being it would be a way that my lil could play in the water to stay cool just like the other children around do.
Very limited to supplies on hand. Well, lets just say it’s not quite what I had envisioned or wanted to make. While it could use a couple changes and improving, it works. So here is ours….
 (Seriously want to hide. Not very pleasing to look at.)
To make one you will need to have some kind of wall and or back to attach the items to. As a renter you have other things like it can not be permanent or attached to the main structure. So we had a baby gate in the closet that allowed for easy attachment of stuff with the plastic lattice of the gate.
So I had been tripping over these darn pool noodles for days now. Every time I picked them up and than turned around the things had once again come out of the closet some how. So I jumped at the chance to cut the darn things up and use them.
Simple just get creative. Every thing else came from under the kitchen sink [home to our recycle bin bags] . I wish I had used zip ties, I plan to make some modifications to this in the very near future. Once all said and done, it took a total of 20mins to make with 2+ hours of play time already on it. This definitely is one project that is going to be worth doing the modifications and putting some money into it.
All ages have enjoyed it, as you can see below, my youngest tries drinking the water the constantly. The constant No’s and don’t do that, had not been working. Until, yup she got something floating in her little cup thing she had been using. Right before opening her 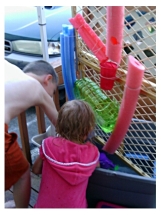 mouth to drink she seen it, and screamed. Resulting in dumping the water out. (I laughed hoping that may have finally got my point across. Will see.)
* Some of my favorites and my inspiration; 
This is the first water wall I just fell in love with. Unfortunately after much searching on pinterest, (this one has been re-pined so many times.) I still could not locate its original creator.
The great minds over at TinkerLab, had one of the best pictorial step-by-step instructions, I found. With the added fact it’s quaint, their DIY Water Wall.
The second water wall I had ever stumbled upon on the internet was from the truly awesome minds from the people at Art Beast Studio. What more can I say other than, Wow!
Growing A Jeweled Rose, has Bath Time Water Wall and Pool Noodle Water Wall.
I truly kid you not. There are so many different variations to this out on the web. It really is worth taking the time to look at several of them before creating your own.
